Pages

Subscribe:

Ads 468x60px

Showing posts with label Pokemon Guides. Show all posts

Thursday, September 4, 2014

7thAndZ Pokemon X (3ds) - Vivillion Addiction

Pokemon X Log no. 0003
September 4, 2014

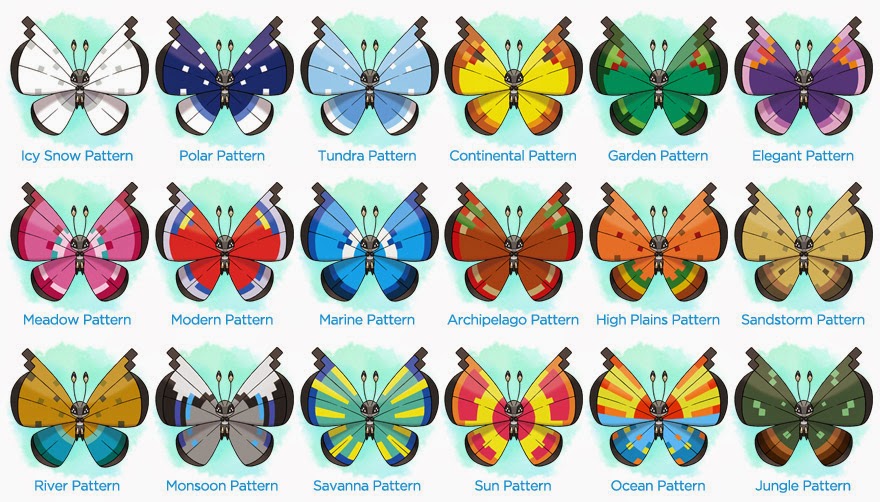
The first time my eyes saw this Gen 6 butterfly I said to myself "Well, this is better than Butterfree." So I decided to capture a couple and raise it later. As I played through the game I was able to battle a NPC at the Battle Chateau and saw another Vivillion but this time it has a different design. So I though it was gender differences but it wasn't. So i tried to find one an later got frustrated cause no matter how many times I try it always ends up the same design pattern which is the High Plains pattern (as seen in the picture below).

So as frustrated as I am, I decided to get one over the GTS. And i was even more surprised as I saw more than two patterns. I was so amazed and from that moment on I had the Vivillion Addiction!


I eventually found out there were 18 regular patterns and 2 event patterns. And after a couple of days this is what i was able to achieve.  
I got all 18 regular patterns but only 1 event pattern. 
I was too late when I found out about the event.

Finally I have satisfied my quest in collecting these addictive Gen 6 butterflies but my addiction has not ended since I need to get my hands on one more event pattern. And i hope in Omega Ruby there will be more new patterns to collect. It's also time for you to jump in the "Vivillion Addiction Fever". Till next time.


Saturday, August 30, 2014

7thAndZ Pokemon X (3DS) - Poketransporter and Pokebank [Log 0001]

After completing the game I could not help but think about my hard earned Pokemons on my Pokemon Black 2. Not to mention the Dream World Pokemons where you have to go through the different maps and the amount of time I invested in Pokemon-gl.com.

With this in mind I had to get the Poketransporter and the Pokebank. I was to late for the free trial so i had to buy a Nintendo eCard. Thanks to my cousin Rey a.k.a Banoy from Australia I was able to get a hand on a $20 Nintendo ecard.


Now I am able to transfer all my Pokemon from Black 2 to Pokemon X. YEY!


7thAndZ in Pokemon X

Finally I got my own handheld console and a Pokemon X 3ds game cart. Well I'm sort of a late bloomer.


I started out immediately my first Pokemon X journey on August 2, 2014 and as usual like all other Pokemon games I've played I always go for the Fire type. I just like fire types. so i choose:


I trained a Fenekin which i named Iya which has just evolved as shown on the picture above. And like any other Pokemon games I will have to train my Pokemon and battle 8 gym leaders and obtain 8 gym badges for me to battle the elite 4. But of course the game would be straight out borring with out the villains: Team Flare which battles with fashion and style with the plot of cleaning the entire population and saving only members of Team Flare. I as the hero should try to stop them. Good thing EXP SHARE works better in Pokemon X and was able to level-up and train my Mons very well. But, I didn't loot at EVs ans IVs at the moment. All I was focused on was to finish the game first. Yeah soon enough i was able to defeat team flare and was able to encounter the Legendary Pokemon Xerenas:


I believe i slept at 2 a.m just to finish this part of catching Xerenas. Also another NEW and awesome feature introduced in Pokemon X is the Megaevolution. My first mega evo pokemon was Lucario and followed by Charizard. Currently Im completing the megastones and will be posting soon on the mega evolution I obtained.


There are Two Mega Charizard and what I have in my game is the Mega Charizard X which in my opinion is way cooler and looks much scary compared to Mega Charizard Y. With the help of the the Mega Evolution technology. I was able to reach the elite 4.


Sadly I was so hooked up with my elite 4 battle that I was not able to take screenshots. But eventually I was victorious with my quest on defeating the elite 4 and finished the game on August 10, 2014.


After done with the game I can now get on to Completing the National dex of 700+ Pokemons and start breeding and training my team of future battles. Ill be updating as much as I can regarding this game specially with the post game features of Pokemon X.


Tuesday, November 27, 2012

Pokemon Black 2 Daily and Weekly Events


Daily Events:

Swarms
Location: Everywhere

Like previous games, Pokémon Black 2 & White 2 has included a varierty of swarms. These swarms, like the past swarms, activate after you have received the National Dex, change each day at midnight and go through a random selection of possibilities. The focus of these swarms are Pokémon that don't normally exist within the Unova region and as such can only be obtained in the wild using this method
In order to check the swarms, you need to enter a gate between two areas and look at the ticket going along on the back wall. It will mention that there is a swarm of Pokémon going on in that particular route. Go to that route and you'll find the Pokémon.
Castelia City - Massage
Location: Castelia City
In the Pokémon Gym street of Castelia City, when you enter the building opposite to the Gym, you will find a character who will give your Pokémon massages. These massages increase your Pokémon's happiness and you can give one a day

Castelia City - Castelia Ices
Location: Castelia City

In the Mode Street of Castelia City, when the season is not Winter, you'll be able to go and buy a Castelia ice item from the shop. Unlike in Black &White, it's not limited by a certain day and you don't have to wait in a queue for it

Castelia City - Art Gallery
Location: Castelia City

In the Mode Street of Castelia City, you will find another building on the right. In this building, you will find a Clown who is requesting to see a specific type of Pokémon. Show him a Pokémon of this type and he will provide berries to you. The type of Pokémon will change each day.

Castelia City - Royal Unova
Location: Castelia City

In Castelia City, after you have defeated the Elite Four, you will now have access to the special ferry; the Royal Unova on the Cruise Dock. Each evening, you can go on the Royal Unova and battle the various trainers on the boat. After defeating the trainers, you will receive an item based upon your success

Castelia City - GameFreak Battles
Location: Castelia City

After defeating the game, you will be able to battle various people within GameFreak. These trainers have got solid, strong teams that can cause some serious damage and are among the highest levelled in the game. They can rebattled daily

Castelia Sewers - Healing Items
Location: Castelia Sewers

Inside the sewers of Castelia City, there is a lab where a scientist works. Each day, she will give you an item due to her success in testing. These items are healing items such as the Potion, Super Potion etc.

Virbank City - PokéBalls
Location: Virbank City

In Virbank City, outside the gym, you will encounter a man who will give you PokéBalls each day. These balls vary in type of PokéBall and Great Ball so very handy early in the game

Nimbasa City - Ferris Wheel
Location: Nimbasa City

In Nimbasa City, you will discover the Ferris Wheel. Outside the Ferris Wheel, after you have beaten the Nimbasa Gym, you will find a new trainer outside it every now and then. They will challenge you to a battle and then go up on the Ferris Wheel with you.. Sometimes, there won't be a trainer to battle, but it will be an important character such as Bianca, Cheren or your rival. The people you face change depending on your gender and the season

When you have defeated the Elite Four, you will encounter your rival on Tuesday, Bianca on Wednesday, N on Friday and Cheren on Saturday

Nimbasa City - Dome
Location: Nimbasa City

At numerous points within the day, the sports halls in Nimbasa City will give you access to a variety of different sports courts. On these courts will be a variety of trainers that you can rebattle every single day. Defeat the trainers and you may even receive an item. The sports are as follows

Small Court
Tennis: Morning
Baskettall: Afternoon
Large Court
Soccer: Morning
American Football: Afternoon

Route 5 - EV Reducing Berries
Location: Route 5

Every day, there is a Pokémon Breeder in Route 5 who will sell you some berries. These berries are not just standard berries but are the rare berries which reduce your Pokémon's Effort Values. She'll sell you 5 of a random berry each day for 200P.

Driftveil City - Heart Scales
Location: Driftveil City

In the south-west part of Driftveil City, there is a person who will give you a Heart Scale each day. This is incredibly handy as they can be used in order to teach Pokémon old moves. However, she will only give you the Heart Scale if you bring a Pokémon that knows a specific move and the move changes each day

Rival Hugh
Location: Driftveil City

Finally, you will encounter the Rival in old Team Plasma's house, where he is trying to make ammends and feels bad after they helped to stop new Team Plasma from taking over the world. Once again, he will challenge you to a battle

Twist Mountain - Fossils
Location: Twist Mountain

In the Twist Mountain Cave, there is a man who will give you a fossil once a day after you have obtained the National Pokédex. These fossils are the fossils of the Kanto, Hoenn & Sinnoh Pokémon.

Icirrus City - Quiz
Location: Icirrus City

Each day, when you enter the northernmost house of Icirrus City, you will be forced to participate in a quiz. This quiz tests your Pokémon knowledge. If you win, you will receive the Antidote, but if you get the question wrong, you'll get a Paralyz Heal

Humilau City - Mienfoo Walking
Location: Humilau City

In one of the houses in Humilau City, an elderly woman will request that you walk her Mienfoo. Accept and walk around the house a few times and talk to her. She'll give you a Pearl and this can be done each day. If you try to exit, however, she will get angry.

Opelucid City - Musical Props
Location: Opelucid City

In a building on the lower left building of Opelucid City, you will discover a man who will give you new Pokémon Musical Props every day. Keep coming back to him and he will give you new Props every day until he is out of props for you. He has 5 props to give you.

Undella Town - Cynthia
Location: Undella Town

Like in Black & White, Cynthia can be found in Undella Town during the Spring and the Summer. She will challenge you and will be able to be rebattled on a daily basis

Striaton City - Gym Battle
Location: Striaton City

In Striaton City, the former Gym Leaders, Cilan, Chili and Cress, will each offer you to join them in battle against the other two. This battle is a standard MultiBattle and all the other trainers have three Pokémon. These battles can be done daily.

Striaton City - Big Mushroom
Location: Striaton City

In Striaton City,at the north of the restaurant, you will be given a task of selecting the right Pansear. three Pansear will be sent on stage. If you can track the right one as they move around, you will receive a Big Mushroom.

Plasma Frigate
Location: P2 Lab - Plasma Frigate
Rebattle? Yes

After you have defeated Team Plasma, their frigate will be docked at the P2 Lab and show that the people there are trying to reform. Colress is found on the bridge of this boat and will battle you. He can be rebattled on the deck of the frigate

Pinwheel Forest - Fighting Rock
Location: Pinwheel Forest

In the south east of the Pinwheel Forst is a stone. If you take a Fighting-type Pokémon to this stone, you can interact with the rock. It'll say that the Pokémon's veins are pumping and you will receive a Star Piece item. You can return each day to receive another

Stunfisk Outbreak
Location: Striaton City

In a weird instance, every night, the Striaton City area will become swarmed with Stunfisk. These Stunfisk aren't battleable but do bring conversation points for those in Striaton City

Village Bridge - Fishing Contest
Location: Village Bridge

After getting the Super Rod and speaking to the fisherman near the east exit of Route 8, you will find him in Village Bridge where he will provide numerous challenges for Pokémon to capture while fishing. Show him the Pokémon he requests and he'll give you a Dive Ball

Join Avenue
Location: Join Avenue

When your Join Avenue starts to fill up, you'll notice that you can purchase items from the stores there. However, with these items, you can only buy one of each particular item each day, meaning you cannot overuse them.
In addition to that, if you have the Lottery shop in the Join Avenue, you can participate that once a day in order to win prizes

Accumula Town - Pokémon Size
Location: Accumula Town

When you reach Accumula Town, each day you can visit the people in the north-eastern house. In this huse, if you speak to the person by the Piano, they will request to see a small or a big Pokémon, usually specifying the species. If you show them this Pokémon, you will receive a PokéDoll if it's a small one or a Fluffy Tail if it's a large one

Black City/White Forest
Location: Black City/White Forest

After defeating Black Tower or White Treehollow, the markets in Black CIty & White Forest begin to sell items. There are four stalls in the marketplace and they each will sell you one item per day, with the item changing each day. These items are all evolution items

Nacrene City - Café Warehouse
Location: Nacrene City

In the Café each day, the characters on the bottom floor will change. On Thursdays, the trainer who owns the mysterious "Dirty Handkerchief" will appear, where you can give them the item back. On Sunday, afterwards, you can speak to the waitress and receive the Fluffy Tail

Weather Stones
Location: Route 8

By the entrance to Tubeline Bridge, there is a Parasol Lady who will give you a specific item depending on the time of day. You can go back each day to get the items. There are four items spread across each day, but you can only obtain one.

Picture  Name    Effect    Time

Damp Rock                      A Pokémon hold item that extends the duration of the move Rain Dance used by the holder.                      05:00-09:59.

Heat Rock                         A Pokémon hold item that extends the duration of the move Sunny Day used by the holder.                                                10:00-16:59.

Smooth Rock                  A Pokémon hold item that extends the duration of the move Sandstorm used by the holder.                        17:00-19:59.

Icy Rock     A Pokémon hold item that extends the duration of the move Hail used by the holder.                                                               20:00-04:59

.
Weekly Events:

Anville Town - Item Trades
Location: Anville Town
Day: Saturday/Sunday

On most weekends in Anville Town, numerous new characters are within the town. These characters will happily trade items with you. They will tell you what they want, such as 20 PokéBalls, or 2 Escape Ropes and will give you items such as Revives, PP Ups and Full Restores in exchange.

Anville Town - Lost Property
Location: Anville Town
Day: Saturday/Sunday

Each week in Anville Town, you can talk to this man in Anville Town. Each week, he will provide you with a gift of an item that was lost in the Battle Subway. This is based upon your progress within the Battle Subway

#630 Mandibuzz
Location: Route 4
Day: Thursday

Method:
Hidden away in Route 4 in Black 2 is a special area where birds are said to come on Thursdays. If you go behind the person's house on those days, you will see a wild Mandibuzz with its Hidden Ability

#593 Jellicent
Location: Undella Bay
Day: Monday (Black 2), Thursday (White 2)

Method:
On some occurances, when you enter Undella Bay, you will see a wild Jellicent sitting just offshore. This Jellicent returns to Undella Bay on Mondays in Black 2 and Thursdays in White 2. It has its Hidden Ability and is male on Black 2 and female on White 2

Tuesday, August 21, 2012

Pokemon Advance Breeding Guide (NDS)

Before we start, I'm going to go ahead and tell you to go on over to the Basic Breeding Guide that was conveniently made just for you. I highly recommend you go and read it; even if you think you know a lot about breeding, it won't hurt to brush up on your skills. I am trying my hardest to not repeat the same things I said in the other guide, but I might reference at times, so it's in your best interest to at least skim over it


t's also a great idea to only start advanced breeding in-game in the post-game (after you've beat the Elite Four the first time). It's actually pretty hard to do all this before you've beaten the Elite Four, and is downright difficult to IV breed before you've beaten the Elite Four. Just do yourself a favor and go ahead and beat them. Of course, that's not to say you can't start looking over this guide beforehand, just wait until post-game to actually start advanced breeding.
I will also note that the EV Training Guide and this guide go hand in hand; each are necessary to creating the coveted "perfect" Pokemon. While no Pokemon is undefeatable, you should probably get as close as possible, which is why it's an excellent idea to head on over here. It doesn't matter what order you read them in, but I might reference EV training from time to time. However, it you want that "perfect" Pokemon, you cannot start EV Training until you have bred for perfect IVs.
One last thing: this is a very in-depth guide and will not be understood overnight. I will try to put in tables and such, but you need to pay attention to each word that's stated so you understand what's happening.
And without further ado, we'll jump right in!

Chain Breeding

We'll start with something somewhat complicated: Chain Breeding. Chain Breeding is the act of breeding Pokemon A to get an egg move onto Pokemon B, than breeding Pokemon B with Pokemon C to get the desired egg move. The reason you do this is because Pokemon A cannot breed with Pokemon C, but Pokemon C wants an egg move Pokemon A has. You can also use this to get two different egg moves onto Pokemon C. Confused? Let's look at an example:
Say you wanted a Skitty with both Wish and Fake Tears. These moves are both egg moves. Now, no Pokemon learns both these moves and is in Skitty's egg group: so you have to chain breed. Here's what you do:
  • First, get a male Togetic TogeticMale that knows Wish (learned at level 29).
  • Breed it with a female Plusle PlusleFemale and produce a male Plusle PlusleMale with Wish as an egg move.
  • Now, level up that male Plusle PlusleMale to level 21 to learn Fake TearsBe sure not to delete Wish for another move along the way, or else you'll have to go back to the beginning. (Also, it is recommended you keep the move you want to pass down at the bottom of your Pokemon's move roster, because the top-most moves are the ones that are forgotten if the Pokemon learns a new move while in the Day-Care.)
  • Breed the male Plusle PlusleMale and a female Skitty SkittyFemale to produce a Skitty with Fake Tears and Wish.
Do you see how the Skitty got the two moves from both Togetic and Plusle? Pokemon that have two different egg groups are really good for this, as they can breed with many more Pokemon. Now let's look at another example.
Let's say that you wanted Charmander to learn Beat Up (Beat Up is an egg move). Now, no Pokemon both learn Beat Up and is in Charmander's egg group, so you're forced to chain breed.
This time, you just simply need a connection Pokemon that's in both egg groups (in this case, Charmander's egg group and Houndoom's egg group). You would use this when you have a Pokemon that you want to learn an egg move, but no one learns it in that Pokemon's egg group (like our bully that is a Charmander). So, you get that Pokemon in both egg groups and connect the two Pokemon. For example, here you would do this:
  • Breed a male Houndoom HoundoomMale with Beat Up (learned at level 26) with a female Arbok ArbokFemaleuntil you get a male Ekans with Beat Up.
  • Breed that male Ekans EkansMale with Beat Up with a female Charmander CharmanderFemale.
And there you have it. A Charmander with Beat Up. Not overly difficult. Did you see how the Arbok really didn't contribute to the Charmander's movepool, but had to be in this chain anyways? Of course, as you want more than one egg move, these chains become extremely long. Just be careful and know what you're doing, and it shouldn't be extremely hard.
There's one more part of Chain Breeding: illegal move combinations. These are simply when a Pokemon can't learn two of it's two of it's egg moves. For example, Charmander can't learn AncientPower and Beat Up together, because no Pokemon learns these two moves, and there's no Pokemon that can connect these two moves together like Arbok did just now.
It's worth noting that all this chain breeding isn't needed in the Field egg group, where Smeargle is, simply because Smeargle can learn any move (through it's signature move Sketch). So that also means that there's no such thing as an illegal move combination in the Field egg group.

Masuda Method for Shiny Eggs

Now we're going to delve away from egg moves and focus more on shiny Pokemon. Which, if you know what they are, probably made you perk up a bit. Shiny Pokemon are merely Pokemon of a different color (such as a black Charizard). Shiny Pokemon are highly coveted, since there's such a small chance of finding one. Whether a Pokemon is shiny or not does not influence it's stats at all, so they are mainly shown off and such. Again, these Pokemon are extremely rare in the wild (the regular chance of a shiny Pokemon appearing in the wild are 1/8192, approximately 0.012%). Fortunately, Gamefreak director Junichi Masuda gave us a much easier way of obtaining these. Masuda, on his blog, told us that if Pokemon from different countries breed the odds of a shiny are increased.
So essentially now if you breed a German Onix and a Onix you just caught (assuming you're not also playing with a German game version), the odds of hatching a shiny Pokemon are increased six times to about 1/1366 (or, in any of the 4th Generation games, the odds are increased four-fold to 1/2048). That's still a frightening number, but loads better than the regular chance of getting a shiny. Some things to keep in mind:
  • If you breed two Pokemon you caught/bred yourself, than the chance of hatching a shiny is still 1/8192. No matter what.
  • If the Pokemon you use are both foreign but from the same language (such as two Japanese Seel), than the chance is still 1/8192.
  • In 4th Generation games, you can still use the Masuda method but you cannot pass down natures using the Everstone. This is fixed in Black and White.
  • Foreign Pokemon obtained in-game are not technically foreign, such as the German Magikarp in DPPt. Though they are a different language, they weren't actually obtained in a foreign game cartridge.
That's mostly it. Obviously, a foreign Ditto is extremely helpful if you just want a shiny. Also, you can still pass down IV's and such when using this method, but you get the added bonus of a possible shiny. Finally, there is no other way to get a shiny Pokemon while breeding other than those stated (getting one by pure luck or using the Masuda method), unless you're playing Diamond, Pearl, or Platinum, in which case you can use the Poke Radar (which involves a process known as "Chaining," to be covered in a separate guide later on). There is one other way that involves questionable techniques to manipulate the random number generator in the game (called "RNG-ing") to hatch or encounter shiny Pokemon — this will not be covered on this site; you'll have to find information on it elsewhere, sorry.

Magma Armor and Flame Body

Like other abilities that have effects outside of battle, Magma Armor and Flame Body help with breeding. If a Pokemon with either of these abilities is at the front of your party, then the steps taken to hatch an egg are cut in half. Instead of you searching for a Pokemon with Flame Body, I'll just tell you a few of the Pokemon that have Flame Body accessible to you.
  • Volcarona Volcarona — Besides being great in beating the Elite Four and Cynthia and such (which you might know from this site's walkthrough), Volcarona is found at the bottom of Relic Castle. Volcarona will always be found with Flame Body.
  • Larvesta Larvesta — Like its evolution, Larvesta has Flame Body. This can be hatched from an egg given to you on Route 18 (right next to Nuvema Town).
  • Magby Magby (and its evolutions) — If you have Pokemon White, Magby can be found in the White Forest when Vincent is there. Magby has a 100% chance of having Flame Body.
  • Litwick Litwick (and its evolutions) — Litwick has only a 50% chance of having Flame Body. It is found in Celestial Tower, and is common on the lower floors.
As a side note, there are no Pokemon with Magma Armor readily accessible to you. Now, before you get your hopes up too much, no, if you have two Pokemon with Flame Body in your party, the time it takes to hatch an egg will not be reduced a fourth. If you have 5 different Pokemon with Flame Body and one egg, than the egg still takes half it's usual time to hatch.

IV Breeding

Introduction to IVs

Here we get complicated. You can't just skim through this section and understand, if that's what you've been doing. A fair warning. This is the part where it's important you have to have beaten the Elite Four (because then Ditto becomes catchable in the Giant Chasm). Well, let's get started!
IV's are essentially a Pokemon's genes. They are determined when a Pokemon is caught or hatched, and cannot be changed through any means after it's been caught/hatched. But the important question: What do IV's actually do? Well, they influence stats, and in that regard are much like EVs (however, they are gotten onto your Pokemon much differently). Every single Pokemon you have has between 0 and 31 IVs in each of its six stats. You can only see your Pokemon's IV's full effect at level 100. So at level 100, one IV equals one stat point (it will be proportionate to your Pokemon's level prior to level 100, so a level 50 Pokemon with 30 IV's will have roughly +15 in that stat).
Let's look at a quick example before we move on:
 Serperior
Serperior (0 IVs)
Serperior
Serperior (31 IVs)
HP261292
Attack218249
Defense195226
Sp. Atk155186
Sp. Defense195226
Speed294325

First, a few things about this table. These Serperior all both level 100, they both have 252 Speed and Attack EVs (with 4 HP EVs), and they both have a neutral nature. Now, one has 0 IVs in each stat and the other has 31 IVs in each stat. Hopefully you can tell which is which (if you can't, the first one has 0 and the second has 31). Now, you may think it's not a huge deal, but really, one Speed point can determine whether or not you go first, which can decide a battle. So now you know what IVs are.
In a real-world situation, you will end up with relatively random IVs, so you could have something like 6/21/14/30/18/20 for one Pokemon's IVs and 18/5/2/31/20/21 for another's. You'll often times see IVs listed with slashes: the accepted order is always HP/Attack/Defense/SpAtk/SpDef/Speed. Remember that if you happen to see people talking about their IVs in shorthand like that!

Ditto

The IVs your Pokemon has can only be (somewhat) controlled through breeding, and not in any legitimate way can you make a wild Pokemon have certain IVs. So now we have to breed to obtain perfect IVs. You should immediately be looking at Ditto, due to it's versatility (if not, don't worry, you'll learn). Wild Ditto are again found in the Giant Chasm, in the foresty area, and there is a 1 in 6 chance (in the wild) that they have a perfect IV in one stat (and that's true for all Pokemon). You should read the sentence and immediately be leaving to the Giant Chasm to catch an army of 36 Dittos. Why 36? Well, you want six Dittos, each with one stat that has 31 IVs. And six times six is 36. It may or may not take you more Dittos than this to get a set of perfect IV Dittos, since it is randomly generated and all.
How can you tell if your Ditto has a perfect IV in one stat? Well, since Ditto's base stats are all equal (47), then it's a bit easier. So this following table will show the numbers your Ditto needs to have to have a perfect 31 IVs, and will also apply to any and all stats that Ditto might have.
LevelDitto has 31 IVs if stat equals...
HPNegative
Nature
Neutral
Nature
Positive
Nature
Ditto L53130647279
Ditto L55134667481
* L55 Ditto's stats are also for 30 IVs. Be careful!
Ditto L63153768593
Ditto L65157788795

If, when you catch a Ditto, it has one of the stats listed above based on its level and its nature, that means you have a Ditto with a perfect IV in that stat! (Note: Level 55 Dittos caught in the normal grass have the same stat for 31 IVs as they do for 30 IVs, so you should verify they are correct by using a Rare Candy or two and double-checking with an IV calculator, or just stick with the level 63 or 65 ones.)
These Ditto can be found in the Giant Chasm, with the lower-level ones in the normal grass and the higher-level ones in the thick grass. The thick grass ones are recommended because there is no ambiguity when it comes to their IVs, as opposed to problems with level 55 Dittos. Remember again that these numbers apply to all stats (except HP, which is listed up there), so it shouldn't to be long before you have an army of perfect Dittos.

Synchronizers

Quickly, we will cover the ability Synchronize. Synchronize, besides it's in-battle effect, make wild Pokemon have a 50% chance of having the nature that the Synchronizer has. So if you have a Timid Elgyem with Synchronize, then any wild Dittos that you encounter have a 50% chance of having Timid as their nature. A list of Synchronizers available in Black/White:
  • Munna Munna - found in the Dreamyard, this pink flowery blob has a 50% chance of having the ability Forewarn. Of course, you'll know if the Munna has Forewarn, as it'll tell what your strongest move is. If it doesn't, it has Synchronize, and is worth your time.
  • Musharna Musharna - found in the rustling grass in the Dreamyard, but there's only a 5% chance of it appearing even if you find the rustling grass, so it's not worth your time. The level 50 Musharna you can find on Fridays has Telepathy instead of Synchronize, so while it's a somewhat good addition to your team, it has no place in this guide.
  • Elgyem Elgyem - found in the Celestial Tower from the third floor up. It's most common on the fifth floor, where it has a 50% chance of appearing. It can also have the ability Telepathy, and unless you can paralyze/burn/poison Elgyem, you can't tell the difference between the two abilities. This makes the best Synchronizer to catch, since you can paralyze it with Thunder Wave and if you get paralyzed back, it has Synchronize. Catch them up the stairs by the nurse so she can heal your Pokemon after it has been paralyzed.
  • Beheeyem Beheeyem - found on Route 14, with a 10% chance of appearing. However, the levels are much higher (48 and 50 in the wild, and 58 and 60 in the thick grass), which will help to catch a Ditto of your choice when you need to use a Max Repel. Just remember that Beheeyem too can either have Telepathy or Synchronize, and it might be hard to tell the difference.
There are also Abra and Ralts in the White Forest that have this ability, but since they're so hard to get, I won't go into any more detail. Just remember the Synchronizer has to be in the first slot of your party (and you can always, say, catch a Munna, breed until you get the desired nature, then use that Munna to catch wild Ditto). It CAN be knocked out while in the first slot and still trigger Synchronize, so keep that in mind if you want to use a Magikarp or something to catch Dittos with. If you're asking why this is helpful, go reread the Natures section of the other breeding guide.

Power Items

Now, before we go any further, let me address a rather big question you probably have. You might ask, why would you want a Ditto with a perfect IV in a stat? Why, because there are ways for IVs to be passed down. In fact, three IVs will be passed down from both parents. Not three IVs from just one parent; be careful. They are randomly picked between the parent's twelve IVs. And then the offspring's other three IVs are randomly generated. This may sound like a lot of work, but never fear! Remember those items you used in EV Training to double a Pokemon's EVs? Power Items? Ring a bell? You can find them in the Battle Subway for 16 BP each. Power Items can affect which IVs are passed down. So if a parent were to hold a Power Anklet, then their Speed IV will be passed down to the baby. Do you see why you went to that trouble with the Dittos now? Here's a quick list of Power Items and the stat they influence.
 Power ItemEV bonus
Power WeightPasses holder's HP IV
Power BracerPasses holder's Attack IV
Power BeltPasses holder's Defense IV
Power LensPasses holder's Sp. Atk IV
Power BandPasses holder's Sp. Def IV
Power AnkletPasses holder's Speed IV

The table is self-explanatory. Again, these are found in the Battle Subway for 16 BP. Anyways, if you think you're special and you've decided that you're going to give both parents different Power Items, then good for you. But you may not like the end result.
If one parent has a Power Band and the other a Power Belt, then the baby will have a 50% chance to inherit either a Sp. Defense IV or a Defense IV from the two parents. That is, you cannot inherit both. The game randomly chooses one, then randomly chooses two different stats for the baby to inherit. So, in this case, the baby will not inherit both Defense and Sp. Defense, but it will inherit one of them.

How to tell your baby's IVs

Well, simply level it up through a few Rare Candies, (there are a few in-game, and you can find a lot by catching Lillipup with Pickup, keeping it unevolved, raising it to level 50 and walking around and collecting Rare Candies), and enter it into a IV calculator. Don't forget to save before using the Rare Candies, so if your Pokemon doesn't have the IVs you want, you can just soft-reset. The IV calculator can be more specific if you visit the Battle Subway and insert the information that the guy will tell you (he's in the main part of that Battle Subway, and will tell you he's judging your Pokemon's potential). As a side note, if the man in the Battle Subway says, "It's flawless! A thing of perfection!" while talking about, say, Speed, then you know you have a perfect Speed IV. And if your baby has two or more perfect IVs, he will go ahead and tell you all the stats that have perfect IVs. Not hard, right?

Going through the process

A bit confused where to start? Don't worry. We'll go through it together. Let's say you want a Excadrill with 31 IVs in both Attack and Speed, and a nature of choice. Well, first you would get yourself a Drilbur. Breed it with any random Ditto until you have the nature you want. Call upon your massive army of Dittos and find one with 31 Attack IVs. Attach a Power Bracer, and then proceed to breed with this new Drilbur (that should have an Everstone attached to pass down the nature) until you have a Drilbur with the nature you want and 31 Attack IVs. Then, breed this new Drilbur (that should again be holding an Everstone) with another Ditto (remember, you have a massive army that will someday take over the earth) that has 31 Speed IVs, and is holding a Power Anklet. Breed until you have a Drilbur with 31 IVs in both Attack and Speed and the nature you want. Now, there's a 1 in 5.5 chance that you get this Attack IV, a 1 in 1 chance you get the Speed IV, and a 1 in 2 chance you get the nature you want. That's only 11 eggs (not counting the previous Drilburs, which shouldn't take too long anyways), which with Flame Body isn't horribly long.
So, to put that in perspective a bit:
  • Get a Drilbur and breed until you have desired nature.
  • Breed that Drilbur holding an Everstone with a Ditto (with 31 Attack IVs) holding a Power Bracer. Do so until you get a Drilbur with 31 Attack IVs and desired nature.
  • Breed that Drilbur you just got with a Ditto (with 31 Speed IVs) holding a Power Anklet. Breed until you get the desired Drilbur.
  • Yes, I really just restated what I've already said, but this is just review to make sure you understand.

Conclusion

Now is a good time to skim over and make sure all this information absorbed. It's not fun to discover you've been IV breeding wrong when you're an hour or two into it, trust me. Well, either go check out theEV Training Guide, or just go ahead and get started! Just remember that if you want that perfect Pokemon and you have to IVs you want, don't just start leveling up. The EV Training guide explains that more, but that'll essentially lose all the progress you just made. Well, thanks for reading!
This awesome advanced breeding guide was written by Chris V.!

 
Blogger Templates